Care and Feeding of Your Sourdough Starter
It isn’t as hard as you think.
For those of you fortunate enough to hold in your hands a descendant of my sourdough starter, “Dwigt Rortugal:” you are now in possession of an authentic Greater-Bostonian sourdough culture—yes, that’s right, just like the ones you’ve read about in all the hottest, hippest bread baking circles. A descendant of a Philadephian culture, this starter was tempered in the fires of North Cambridge and honed on the streets of Watertown. This lovingly cared-for specimen—possessed of incredible strength and hardiness—was hand-delivered to me by Sara Wachter-Boettcher on a cold winter’s night by the sea, lo those many years ago. And so the legend now continues with you.
Everyone else: your starter is probably fine also.
Either way, here’s how to keep it alive.
Maintaining Your Sourdough Starter
Now, let me get this said from the jump: you’re not gonna have to take this thing out for walkies every couple hours or anything. There’s some maintenance involved, but it isn’t “plan vacations around it”-level maintenance, by any stretch. I feed Rortugal about once a week, mostly based on the looks of ’em.
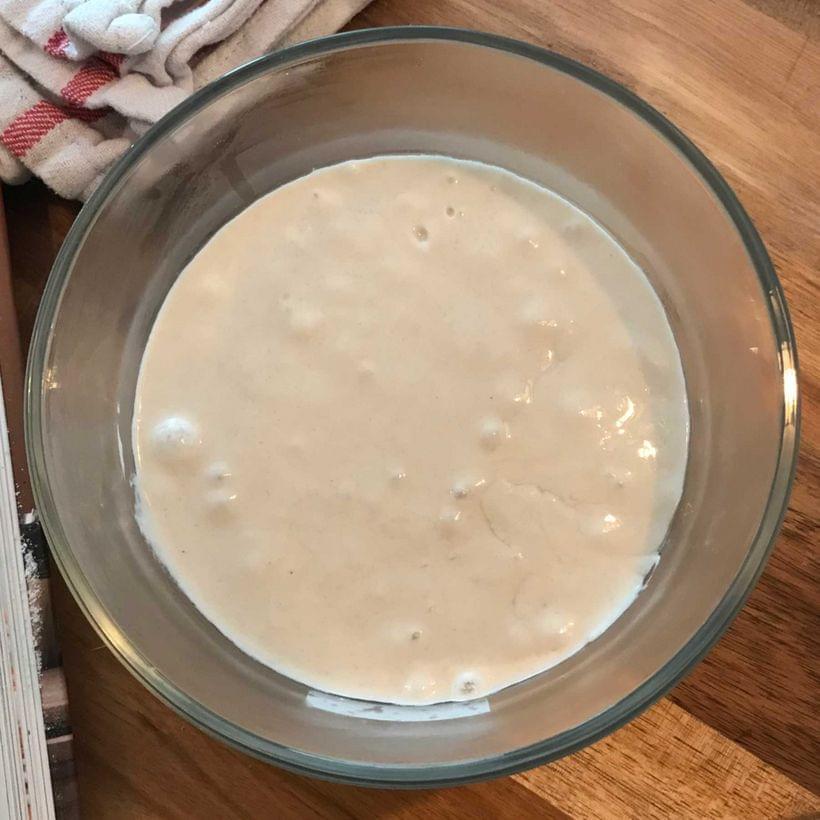
These things are—apart from a bunch of microscopic wildlife—just flour and water in equal parts. If you leave it for too long without feeding it, well, it runs out of food; the yeast converts all the sugars in the flour into ethanol (called “hooch,” straight-faced, in sourdough circles) and CO2, while the fermenting bacteria produce more and more lactic and acetic acids—all told, creating a pretty hostile environment for the already-starving yeast. Dire as that might sound, that’s the normal life cycle of this thing: all those byproducts are responsible for that distinctive sourdough tang. So, with regular feedings, we’re just looking to keep it from spiraling too far out of control—we’re basically transplanting our yeast cultures and helpful bacteria to a new, clean, food-rich environment every so often.
Here’s my routine:
- Get yourself a clean, dry mixing bowl, set it on a kitchen scale, and spoon ~25 grams of starter into it.
- Pour in 100 grams of lukewarm water—a little warmer than room temperature—and stir.
- Add 100 grams of bread flour, and stir until fully incorporated.
- Empty the remainder into a separate bowl, clean your starter’s container with hot water (soap residue can mess with it), and dry it well.
- Put your refreshed starter in there, cover it, and leave it out at room temperature until you can see bubbles starting to form—an hour or two.
- Chuck it in the fridge.
Sometimes I do 150 G. of water/flour; depends on how much baking I figure on doing in the foreseeable future. Some people do equal parts by volume, and I’m sure that works fine too. I bake by weight, so maintaining my starter by weight helps with the math. It doesn’t have to be a one-to-one ratio, but I find that to be the most versatile. Once you’re comfortable enough to wing it a little with your breads, you’ll be able to replace equal parts water and flour from instant yeast recipes with castoffs from feeding your starter, kind of like a pâte fermentée—it’ll give you a little bit of that sourdough funk, and the flavor benefits of a longer bulk rise.
Now, if you’re the sort who sets calendar reminders for things in your life: feed it once a week. If you’re a few days over, no harm done; Rortugal has been surprisingly difficult to kill, and so too is yours, I’ll wager. If freezing it or drying it in the sun won’t kill it, neither will forgetting to refresh it for a couple of days.
If you, like me, aren’t the type to set a calendar reminder, even for things like social events and basic professional responsibilities: here’s my “is it time to refresh Rortugal” checklist: does it feel like it has been a week, possibly, and does Rortugal look hungry? If so: feed Rortugal. Hasn’t failed me yet.
There are really only a few things to look out for: colors (other than a little gray on the surface), and alcohol pooling on the surface. Changing color means something has contaminated it, like mold—I’ve read that there’s a good chance it’ll spring back if you scoop out a normal-looking portion and refresh it. It hasn’t happened to me, so I can’t vouch there. Clear liquid pooling on the surface of the starter—alcohol, produced by the yeast breaking down the sugars in the flour—just means that it’s overdue for feeding. Pour the alcohol off, refresh it as usual, and you’ll be back in business.
Putting It To Use
Now, the above routine means you’re gonna be left with ~200 G. of sourdough cast-off every week, which rules. You can use it as a pre-ferment—say, throw it in some pizza dough or a batch of waffles. Foist it on a friend; tell ’em I sent you. Start a food blog Patreon.
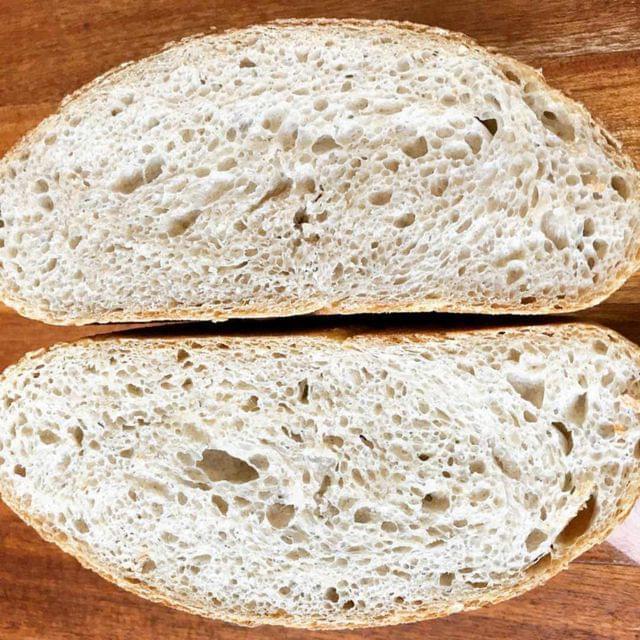
Or—and this part is key—make bread with it.
Now, the trade-off for reduced maintenance is that you have to do a little extra prep for your breadmaking. If you were leaving your starter out at room temperature and feeding it twice a day, it would be ready to go pretty much all the time. But your starter is largely dormant in the fridge, and while it will work just fine that way as a pre-ferment or leavening booster for recipes using instant yeast, it’s not gonna be up to a 100% wild yeast recipe as it is. You have to build it back up a little.
So, the routine for getting a levain—an offshoot of your starter, intended to leaven some bread—up to full strength is the same as your maintenance routine above, but using the out-on-the-counter, twice a day feeding schedule. the morning before you plan on mixing up some dough, take 25 G. from your starter, add 100 grams of warm water and 100 grams of bread flour to it, cover it loosely, and leave it out on the counter for at least eight hours. Before you go to bed, repeat the process (and make sure you’re using a container with enough room to allow it to at least double in size, trust me). Be sure to take a look at your recipe in advance—if it calls for more than ~200 G of starter, bulk it up.
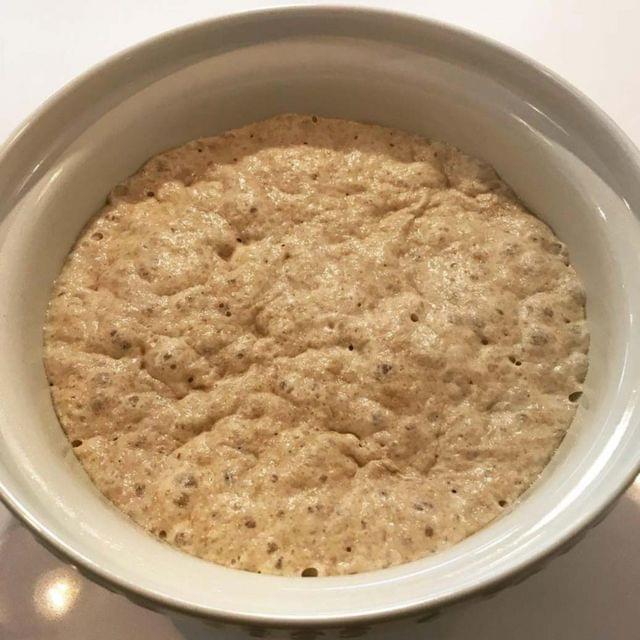
By morning you should have a much more voluminous, foamy blob, fit for baking. You can test for said baking-readiness by dropping a spoonful of it into water: if it floats, you’re good to go. If not, give it a little more time.
Some recipes will call for turning a portion of it into a hard starter and going from there. Some recipes will just have you chuck the entire full-strength levain into your dough, or repeat a feeding cycle with a portion of it, but mix it into the dough before it’s up to full strength. The former, a “mature starter,” will give you a sharper, more sour sourdough; the latter, a “young starter,” will give you a more subtle flavor. Both are good, because like, it’s bread. Bread is good.
Personally though, I like my sourdoughs like I like my cheeses and my Kongs. So, one last tip: you can tell when your levain is at the peak of maturity by letting it rise in a glass container. Once you see streaks of dough on the inside of the glass, just above the surface of the levain: its slow collapse has begun. That means a strong, funky sourdough. If you’re noticing this with your starter in the fridge while making yourself a sandwich—time to refresh your starter.
I Think It Died?
Well, hit me up and we’ll do some troubleshooting. Odds are, though, it’ll be okay with a routine feeding. I wasn’t completely blowing smoke at the start of this post, either: from what I’ve read, the longer a starter’s lineage, the hardier it’s likely to be. If things are looking particularly dire, feed your starter as though you were preparing a levain for baking: feed it, give it half a day at room temperature, feed it again, leave it overnight at room temperature—boom, back up to full strength. Give it one last maintenance-style feeding and chuck it back into the fridge. Absolute worst case, if you’re a Patreon supporter and you’re using one of mine, I’ll send you a new one.