Understanding Sourdough
There are only three ways to write about making naturally-leavened bread on a food blog, and I’m gonna do all of ’em here.
The first is a straight-up recipe, drawing a lot of hard lines and missing a lot of critical “it depends” details. “Add X things, wait Y hours, put it in a Z degree oven, serves four.” When these recipes came out looking anything like the picture, it was pretty clearly a matter of luck. I didn’t know what I didn’t know, but I was pretty sure there was a lot of it.
The second kind of sourdough recipe is always a hair’s breadth away from baking fanfiction. They start with an overly-precious rumination on the nature of their very special and magical sourdough starter—which has a name, and will be addressed as such throughout—and end with something about “the smell of freshly baked bread” filling their home. Still a straight-up recipe, but couched in “this will not work unless you have a very real and meaningful and dare-I-say-magical personal connection with a colony of bacteria and yeast perpetually dying in a blob of wet flour inside of a conspicuously photogenic mason jar.”
The final, and my least favorite by a wide margin, were write-ups from basic-ass tech guys who—in typical basic-ass-tech-guy fashion—would strangle every last gram of fun out of the process. Clinical, joyless documentation, crammed full of unnecessarily gatekeep-y buzzwords and shorthand. I’m all set with A Hacker News Guide to Bread™.
In trying not to write any of those things, I have absolutely written every one of those things, all in one convenient and way too long article.
So.
Here is what I know about making bread using my sourdough starter. Your mileage will almost certainly vary, but try this out, see where it lands you, and tinker from there. At this point, using wild yeast comes as naturally to me as instant, I don’t mind sayin’.
Preparing A Levain
If you always keep your sourdough starter out on the counter and feed it several times a day, two points:
One, feel free to skip this next section. Two, you and I are very different people.
Getting Your Starter Ready
First thing’s first: if you don’t have one, get yourself a kitchen scale. I’m sure I wouldn’t be the first to tell you that it’s way more accurate, but it’s also a lot easier: set your bowl on a scale, dump in one ingredient, reset the scale to zero, dump in the next ingredient, and so on. Any bread recipe worth a damn is gonna be in weights; grams, more often than not.
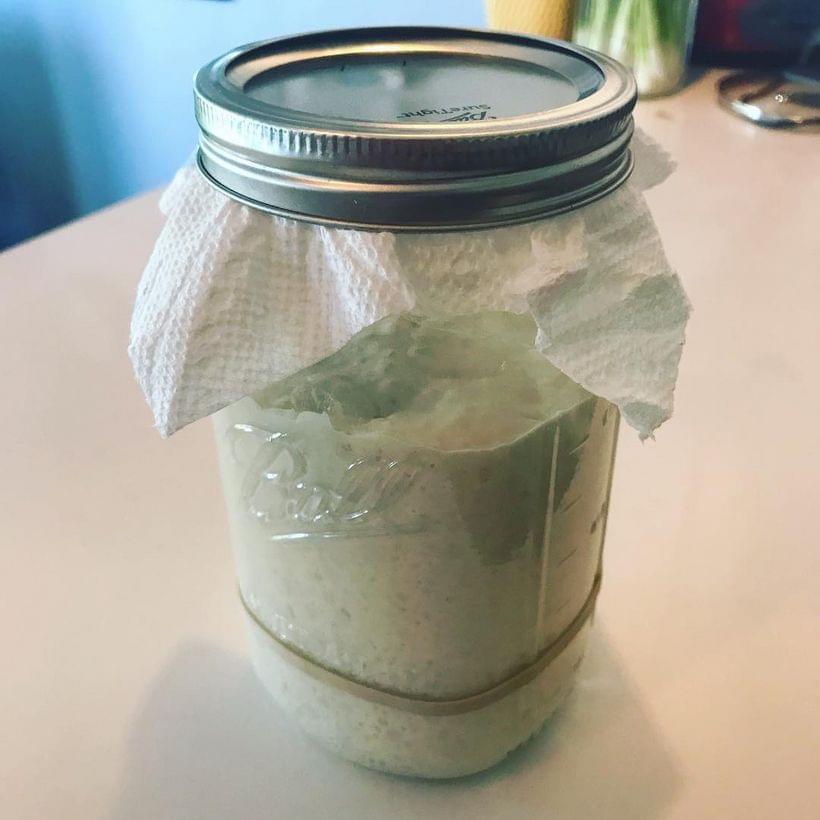
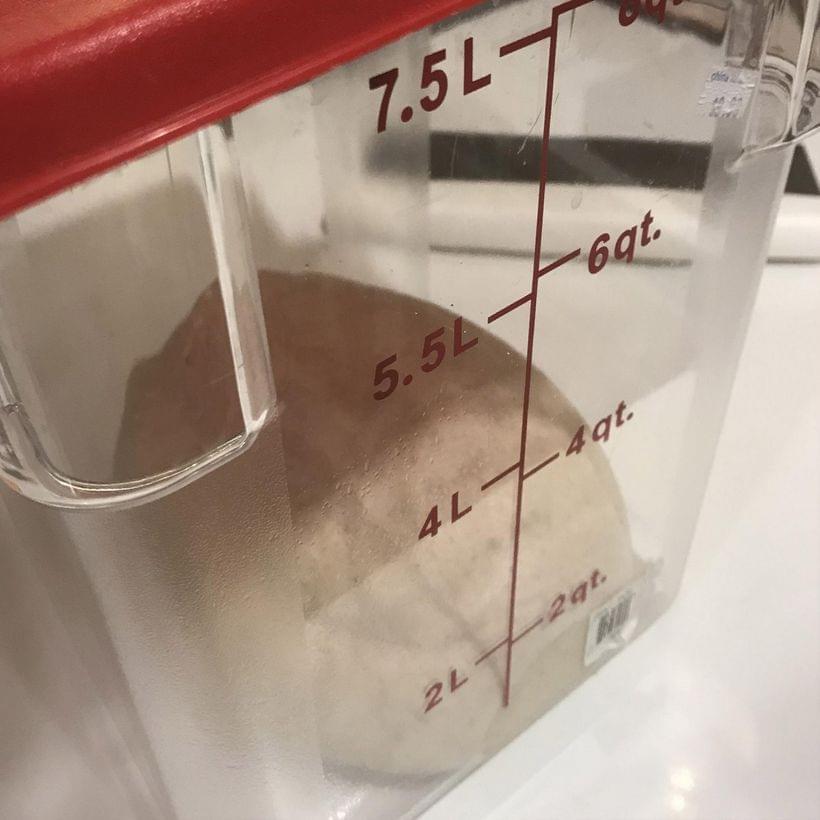
I kinda did this one already. Quick recap, though: if you keep your starter in the fridge, you’ll need to feed it once or twice to get it back up to full strength. In the evening, take 25 grams from your sourdough starter, mix it with 100 grams of bread flour and 100 grams of warm water (90°–100° f), and leave it out on your counter in a loosely-covered container. The next morning, mine is usually ready to bake. To be on the safe side—or if you’re not planning on doing any baking until evening—you might want to repeat the process: discard all but 25 grams, feed it 100G of flour/water again.
Again: your mileage will likely vary. There are a lot of factors that determine your starter’s strength—time since it was last fed, the temperature of your kitchen, etc. It’s tough to make a hard-and-fast rules about this stuff, but it’s something you’ll get a feel for eventually. To start: if it’s doubled in size, you’re good. That’s why I use the Pinterest-ass mason jar arrangement pictured here: mark the height of the initial starter blob with a rubber band or dry-erase marker, and you’ll be able to eyeball “doubled” from across the room.
The Levain Itself
By building up this offshoot of your starter, you’ve created a levain—a natural yeast colony, fit and ready for leavening a recipe. Add this levain to flour and water, apply heat, and bread will definitely occur. I do this plenty, especially when I’m tweaking a baker’s percentage to use my starter in place of instant yeast.
If you need to slow things down for the sake of your own schedule, feed it with cold water, which will keep the yeast in check until it comes back up to room temperature. I’ve even set my mason jar in a bowl of cold water to buy a little more time. It sounds like a lot here, but feeding it takes all of ten minutes, and you’ll get a feel for your starter’s “mood” quicker than you think.
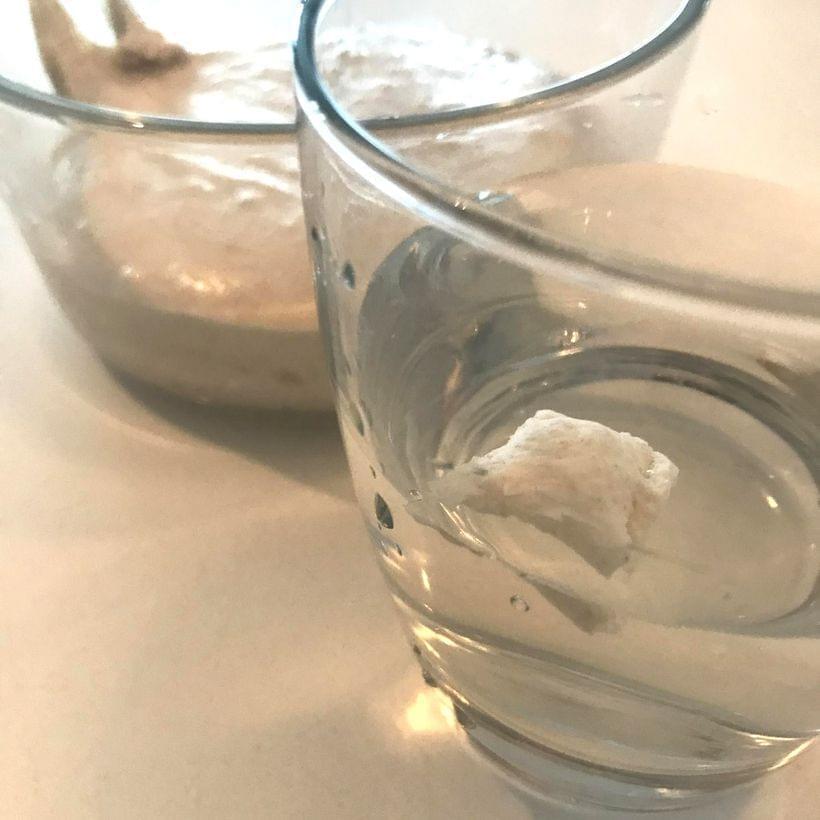
In the meantime, there’s an easy way to double-check that you’re ready to start baking: take a dollop of your levain and drop it into the water you’re using for your bread. If it floats, it’s ready for baking.
Some recipes will call for turning this into a bigger, more involved levain: taking, say, 25G of your built-up levain, and adding it to 100 grams of white flour, 25 grams of whole wheat flour, and 90 grams of lukewarm water. This is usually to bring the levain more in-line with the bread recipe itself–adding smaller portions of the flours you’ll be using, tinkering with the baker’s percentage of water, and so on.

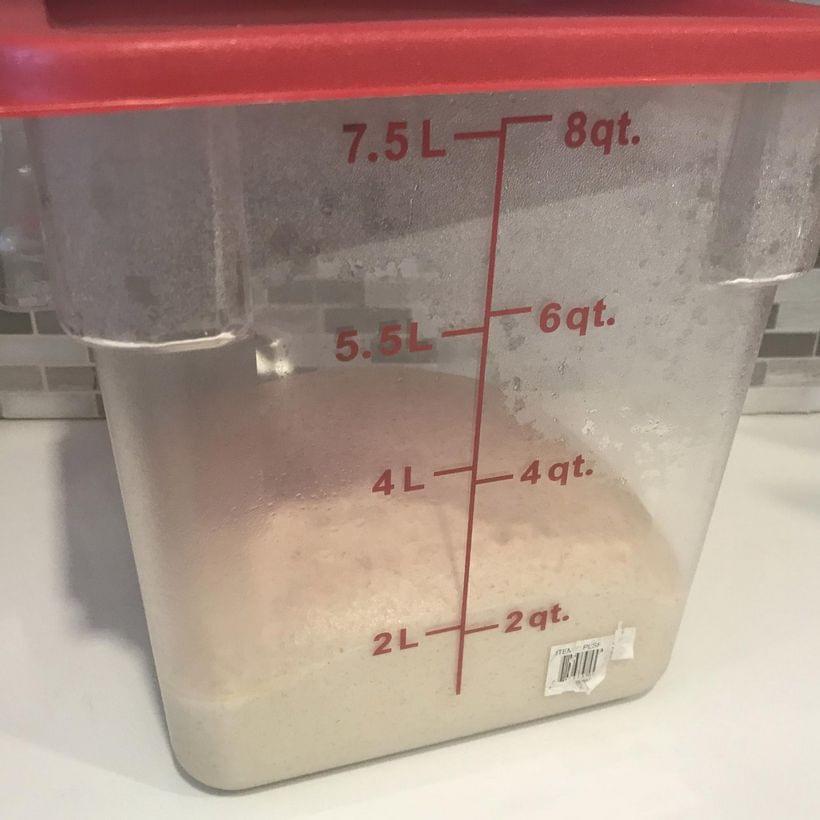
Other recipes will make reference to using a “young” or “mature” levain/starter, which really just means the difference between making bread with a levain still early in its lifecycle—maybe only fermenting for a handful of hours—versus a levain further along. The difference is that a mature levain has had time to be, well, fully taken-over by the natural yeast and bacteria transferred from your starter. The result is that you’re introducing more of their by-products to the total recipe—acids, alcohol, etc.—and thus more sourdough funk.
For something like waffles or cinnamon rolls, you’ll want a young starter: you’re mostly in it for the leavening and and just a hint of sourdough tang—so, as soon as that levain floats in water, you’re off to the races. If you’re going for an italicized loaf of sourdough, with the requisite level of tanginess, you’ll want to use a levain that’s right on the brink—maybe even tripled in size. You’ll know your levain has reached its limit when you notice doughy steaks on the glass, just above the surface: the yeast has run out of food, and it’s starting to collapse.
Understanding Bread Recipes
You’re gonna encounter a lot of percentages as you venture into fancy bread circles, especially in terms of water content. Fancy-ass sourdough recipes in particular tend to focus real hard on “hydration” percentages—all “72.1983% hydration, ” with or without an implied “nyeh” and a pause to push their glasses up the bridge of their noses.
Said nerds are referring to a “baker’s percentage” of water. A baker’s percentage is a way of expressing an entire recipe based on the ratios of its ingredients, by weight. Using a baker’s percentage allows you finesse the size and shape of the loaf—or loaves—per batch of dough. So instead of fussing with all the math involved in multiplying a “serves eight”-sized recipe by some arbitrary amount, the recipe is more along the lines of “ingredients in these proportions, at any amount.”
Now, the only tricky thing here is that this isn’t the percentage of the ingredient in the recipe, with all of them adding up to one hundred—it isn’t “60% flour plus 40% water equals 100% of one bread.” In a baker’s percentage, everything is expressed as a percentage of the total flour weight (TFW). If there’s just one kind of flour, that’s 100% of the ratio, always. If there are multiple types of flour in play, they’ll add up to 100%, always. So, that extremely bad bread ratio I just mentioned wouldn’t be “60% flour, 40% water,” but “100% flour, 66.666666667% water.” Nyeeeh.
Working with Baker’s Percentages
Now, I know, that sucks; math sucks. So, to avoid math as much as possible, I mentally anchor myself at “1000 grams of flour,” which usually gives me two decently-sized boules. It helps that there aren’t a hell of a lot of factors to consider in a “lean” dough: only flour, water, salt, and yeast (or almost only, like my pizza dough recipe)—versus “enriched” doughs, which contain milk, sugar, eggs, butter, etc.
So, here’s a 100% usable bread recipe, using instant yeast, expressed in both grams and baker’s percentages:
| Ingredients | Grams | Baker’s Percentage |
|---|---|---|
| White flour | 900 | 90% |
| Wheat flour | 100 | 10% |
| Water | 700* | 70% |
| Salt | 20 | 2% |
| Instant Yeast | 7 | .7% |
One milliliter of water weighs one gram, if you’re eyeballing things by volume—but a scale is still more accurate.
That ratio nets you “70% hydration” bread—two boules, at the size I usually make ’em. If I were only doing a single loaf, I’d start with 500 grams of flour. 70% hydration would then be 350 grams of water, instead. One bigass boule? 750g flour—750 multiplied by 0.7—I need 525g water. Thats it; that’s the whole deal.
Likewise, in order to avoid adding any new math, I keep my starter itself at “100% hydration”—which, again, just means I always refresh it with equal amounts of water and bread flour, by weight. So, if I wanted to use 200g of leaven instead of the instant yeast in that ratio above, that means I’ll be adding 100g white flour and 100g water to the mix—so I have to adjust the other ingredients accordingly:
| Ingredients | Grams | Baker’s Percentage |
|---|---|---|
| White flour | 800 (+100 from leaven) | 90% |
| Whole wheat flour | 100 | 10% |
| Water | 600 (+100 from leaven) | 70% |
| Salt | 20 | 2% |
| Levain | 200 | 10%* |
* In a baker’s percentage, levain is based on the amount of flour in the levain—which kinda makes sense when we’re thinking of “amount of flour” as synonymous with “how much bread we’ll end up with.” This 200G levain contains 100G flour, so it is expressed as “10%.” Look, I don’t know—I don’t make the rules.
Easy-ish-peasy-ish. Point is, math aside: add together a handful of ingredients, mix ’em, enjoy bread.
Follow the same general recipe a couple of times to get a feel for it, and start tinkering with ratios just for the hell of it—90% of the time you’re not gonna not get bread, and 10% of the time you waste all of twenty minutes and a dollar’s worth of flour. Once you’ve got the hang of this with lean doughs, it won’t be much of a jump to do the same with enriched doughs—meaning you’ve got a path to making damn near anything that calls for the addition of yeast with your sourdough starter.
Just be sure to take notes in case you really nail something that you want to recreate. And speaking of being a big baking nerd:
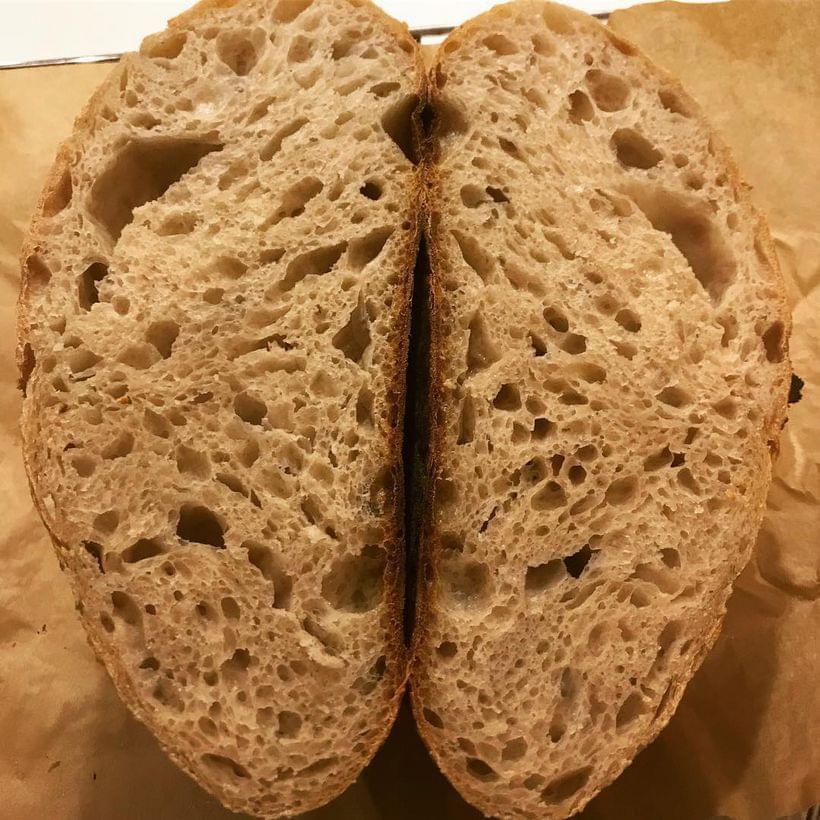
Why “Hydration” is a Whole Thing
Now, a high hydration means two things: an open or “airy” crumb—so, the internal structure of the bread is made up of large, irregularly-sized holes—and a wet, sticky, dough that can be much more difficult to work with.
| Hydration | Crumb Structure |
|---|---|
| 50–60% | Bagels, sandwich bread |
| 60–65% | Dinner rolls, French bread |
| 65–80% | Ciabatta, fancy sourdough-nerd bread |
You’ll see ow-hydration doughs referred to as “stiff,” and high-hydration doughs referred to as “slack” or “rustic.” These are loose terms, though—especially considering that different kinds of flour will absorb more or less water than others.
A stiff dough is a denser dough. When yeast breaks down the sugars in the dough, it produces CO2 among other things—you probably know this. This creates bubbles inside the dough, which are constrained by the density of the dough. A wet, slack dough with a well-developed gluten network will hold its overall shape just as well as a stiffer dough, but be much more flexible, internally—so the yeast can create larger holes.
The trouble is, that airy crumb is impeded by how tricky it is to work with these wetter doughs—hence “rustic” loaves becoming a point of pride for some. You can’t knead wetter doughs the way you can knead stiffer doughs, whether by hand or using a dough hook/spiral on a stand mixer. And unless you build up gluten in your dough, you’re not gonna end up with much in the way of bread at all.
Developing Gluten
Encouraging strong gluten formation means a flavorful bread, a high rise, a light and airy crumb, a crispy crust—the whole ballgame, basically, when you’re working with wheat flour and lean dough. First, some good news: gluten is gonna happen whenever you have water and wheat flour in play. Not great gluten, though; not without some help.
If you mix up all your bread ingredients, slap the dough down on the counter and start kneading right away, you’re not really working with the… life-cycle, I guess, of gluten. I mean, at that point, there isn’t much actual gluten there to work with. There will be in a few minutes, but until then you’re kind of wasting your time. Letting the gluten get itself together, literally, before you start trying to work it into shape—that’s the autolyse step.
Autolyse
Wheat flour contains two partial proteins, gliadin and glutenin. When that flour is hydrated, amylase enzymes begin converting starches into sugars and protease enzymes begin dismantling those partial proteins. Thanks to the work of the protease, the gliadin and glutenin can link together, creating gluten. Now, that takes a little while to start happening—the higher the protein in the flour, the longer it takes. Some plain ol’ store-brand all-purpose might only take five minutes, specialty high-gluten flour can take ten, fifteen minutes. When you knead dough, you’re not creating gluten, just stretching, warming, aligning, and generally encouraging the strands of gluten that have formed naturally.
So, if you chuck everything together and jump right into kneading the dough, gluten will likely start to form within a minute or two, during the kneading—but you’re making a lot more work for yourself, to no benefit. You’ll also have introduced an element that’s working against your gluten formation: the salt.
Salt is a protease inhibitor—it’s gonna be fighting against the breakdown of those partial proteins and the resulting formation of gluten strands. It’s not gonna prevent it—not unless you’re making something inedibly salty, anyway—but it sure isn’t helping.
So, all this preamble, all this “partial proteins” and “enzymatic inhibitors” and so on is to say: mix your flour and water together and let ’em sit for one (1) unit of Netflix original programming before you do anything with it. That’s it.
That’s it! That’s the whole trick—mix the flour and water, wait half an hour—more than enough time to fully hydrate wheat flour of any protein level—then add the salt and yeast. There’s a whole thing about incorporating the salt and yeast/levain with your bare hands, here—folding and squishing, basically, until fully incorporated, and sure, I do that if I’m gonna be hand-kneading everything together anyway. Mixing it in with a stand mixer’s paddle bit would beat the hell out of our newly-formed gluten strands, and we don’t want that. If I’m switching to a dough hook or spiral to machine-knead the dough, though, I’ll just pour the salt on and let the machine knead it in. It helps to reserve a little bit of the recipe’s water to partially dissolve the salt and make it easier to incorporate. Likewise with the yeast—but do this in two separate dishes. You don’t have to be super precious about salt and yeast interacting with each other, as a rule, but adding water and letting it all sit for a bit could do the yeast some harm. Densely salted water doesn’t exactly create a nurturing environment for newly-awakened yeast.
Now, whether or not the yeast matters during the autolyse seems to be subject to some debate. “Autolyse”-as-defined means mixing only the water and flour(s), then incorporating the salt and yeast later. Sometimes, you’ll see it referenced as just holding off on the salt. The reasoning seems to be that the acidic by-products of the yeast’s fermentation work can similarly inhibit the formation of gluten. I’d be lying if I said I could see much difference in the dough either way, using a levain. I figure that tracks: there’s acid in the levain itself, but half an hour isn’t long enough for the yeast to make much progress in breaking down its new surroundings and producing a lot more. With instant yeast, though, you’ll want to add it after the autolyse—half an hour would be more than enough time for it to put in serious work.
Kneading, Flipping, Folding
Let me lay this out from the jump: you can’t really over-knead bread dough, in any practical sense. Certainly not by hand, and not without trying to overwork the dough in a stand mixer. You can make slightly chewier bread than planned, but it’s still gonna be good.
You can, in theory—and only with considerable effort from your mixer—over-oxidize your dough. Just like beating egg whites or creaming butter turns it pale, over-oxidized dough will give you a paler crumb and a little less flavor, like so many grocery store baguettes. In fact, sub-par baguettes were the very thing that led to the development of the autolyse technique: Raymond Calvel came up with it in 1974 in response to the French making pale, bland, store-brand-tasting commercial breads using monstrous industrial mixers. Snag a copy of his book The Taste of Bread if you want to read up on the subject; you could do worse than learning from the dude who taught bread-making to Julia Child. This is all academic stuff, though. Seriously, don’t sweat it. You’ll be fine.
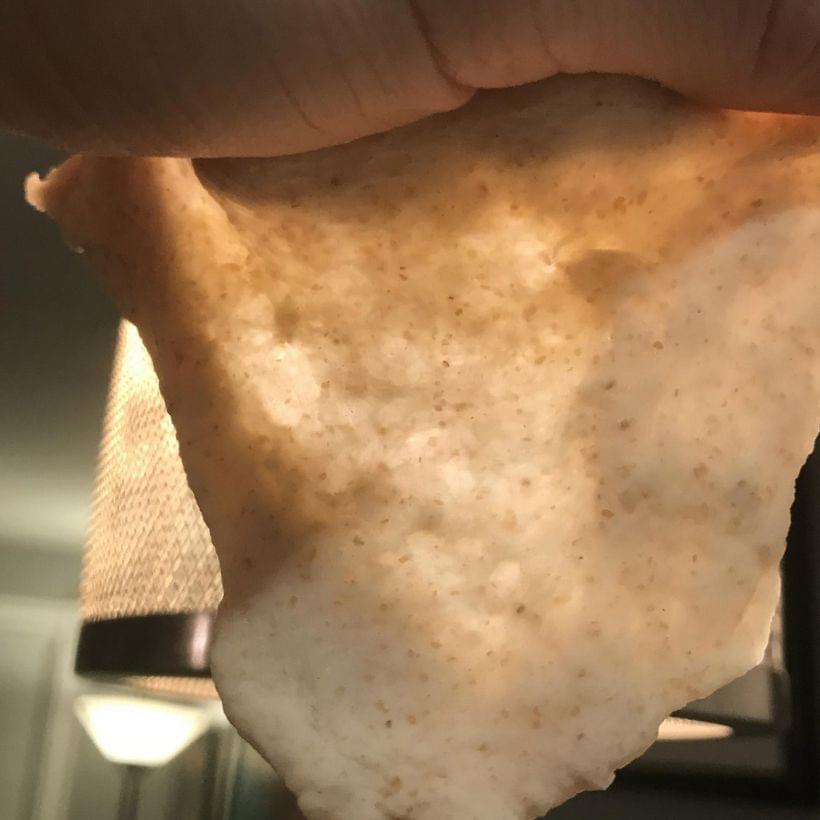
If you’ve made it this far into a treatise on bread, I probably don’t have to tell you about the windowpane test. Grab a little peice of your dough, stretch it thin, and hold it up to a light in your kitchen. If you can stretch it thin enough to see light through it without it tearing, you’re in great shape.
That’s the main deal—that’s your guide for “have I done enough kneading.” Keep going past that, you’ll get denser, chewier bread, which, hey, maybe you want. Stop before that point and you’ll get maybe-a-little-collapsed bread—not gonna win any contests, but it’s still gonna taste fine. This part really isn’t that fussy—if a recipe says “machine knead for six minutes at low speed” and you set your timer to seven minutes by accident, no real harm done.
After a few minutes your dough should be flopping around, bunching up on the hook, and pressing up against the sides of the bowl. If the dough seems a little too wet for it to catch—with the mixer just swirling around in the dough, add flour a teaspoon or two at a time. It’ll firm up the dough slightly and keep it from sticking to the sides of the bowl for a little while. That’ll give the the mixer a minute or two to get the gluten in order and firm up the dough a little more, after which you should be in business. Don’t be too quick on this, though: sometimes it takes a few minutes for the rough to firm up enough to ride around the outside of the bowl. Resting the dough for a minute or two after a few minutes of kneading can help, too.
Speaking of which: before you do the windowpane test, give your dough ten minutes to rest, right there in the mixing bowl. This gives the gluten a chance to relax, so it stretches more easily. If you’re still having trouble with the windowpane test afterwards, just run your stand mixer for a minute or two more. You’ll notice it has a much easier time working the dough now that it has relaxed a little.
Developing Gluten in Slack Dough
Pretty cut and dry stuff, building up gluten networks—that is, unless you’re trying to be some kind of bread hero with a super high hydration dough. A dough hook can’t do anything with that—for a super wet dough, you’re gonna have to get in there with your bare hands. There are a couple of tricks for helping build up the gluten in a super wet dough; some of them I understand, some of them I do not. Most of them I do not use.
Cutting the dough up with a bench scraper, inscrutably, has been said to help; I don’t know why, and maybe nobody does? I keep forgetting to try it, honestly.
Likewise, I do not use the “slap and fold” technique, where you take a wad of the dough and slap it against your work surface, stretch it, wad it up again, and repeat. I’ve tried it lots of times, but never had much luck with it.
My go-to is the Tartine-style stretch and fold technique. The basic gist is this: during your long initial rise, wet your hands to prevent the dough from sticking to them. Reach into the bowl or bucket or whatever, grab the far edge of the dough as best you can, stretch it upwards as high as you can without it tearing, and fold it over the rest of the dough, envelope-style. Repeat this on all four sides. Then, leave the dough alone to rest and relax for about half an hour. After half an hour, wet your hands again, and repeat. The first few sets of folds won’t seem like they’re doing much, but as time goes on the dough will retain its shape a little better, sticking to your hands (and the bowl) much less. Keeping it in the bowl means you won’t be destroying your kitchen counter with stray wads of gluey dough. Looking at you here, slap-and-fold method.
Bulk Rise (aka “Bulk Fermentation,” or “Primary Fementation”)
Strap in, because here’s where things get really wild.
Lightly oil a large bowl (or bigass five-bucks-in-Chinatown proofing bucket, like I use). Roughly shape your dough into a ball, drop it in there, and cover it with a lid or plastic wrap. Wait a few hours for your yeast to get cooking, then put it in the fridge.
You have now completed your responsibilities for the bulk rise.
Now you can either bake it the next day, or wait a few days; whatever is most convenient for you. The longer you wait, the better it’s gonna be—that slow, cold ferment is gonna build maximum bread-y flavor. After four or five days, it might get a little too sourdough-tangy, and not bake up quite as nicely as you’d like it to. After a week or so—just like a starter or a levain—the yeast colony living in the dough will be in decline. The gluten you worked so hard to build up will be weakening, and the yeast will be dying off for lack of food. These two factors combined will lead you to an deflated final loaf. You have, to Paul Hollywood’s assumed dismay, over-proofed your bread.
This behavior in your dough is just your starter’s behavior writ much larger. If you’ve ever fed your “100% hydration” starter a few days earlier than needed, you might have noticed that it’s much more firm and stretchy than you might have expected—you can practically lift the whole thing out of its container. If you’ve ever fed it later than you were supposed to—once it’s in full decline—that same ratio of flour and water will be soupy. The gluten network that came together naturally has broken down.
You can also skip the fridge and let your dough proof for a handful of hours at room temperature, then bake it right away. I do it all the time; it’s fine. It’s bread! Bread is good as hell. But the long cold ferment will get you much more professional-grade loaves, with a burnished, blistered crust and surprising depth of flavor. Plus, you can pull it out of the fridge and have yourself some freshly-baked bread whenever you want it.
Shaping and Proofing (aka “Secondary Fermentation”)
On baking day, remove your dough from the fridge, shape it, and allow it to proof at room temperature for a bit—I usually give it about an hour. It’ll rise a little more during this time, but not much.
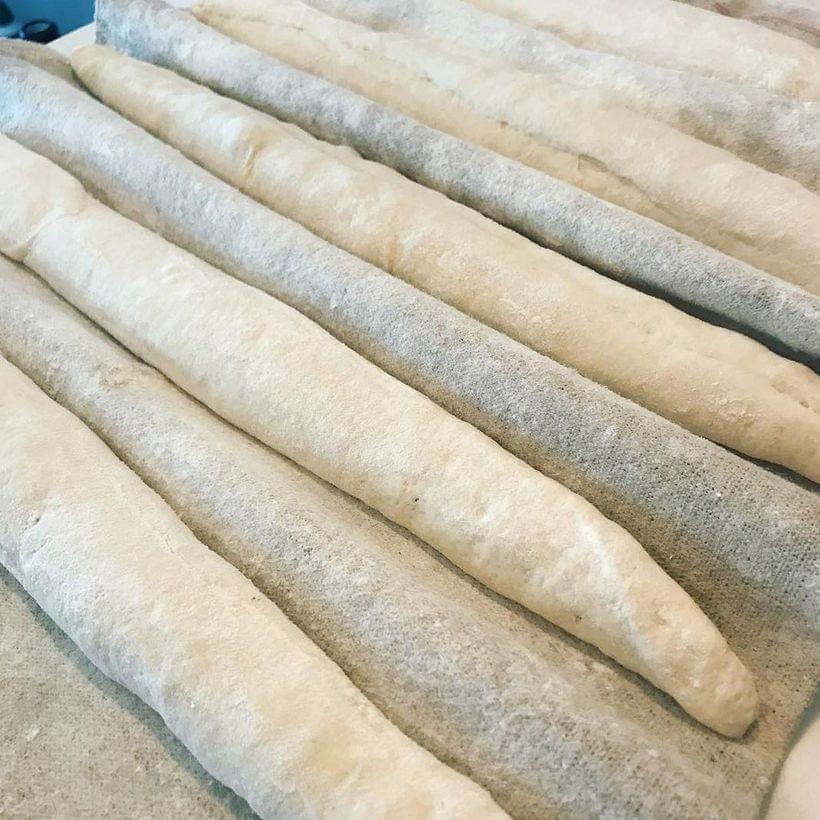
The shaping is 100% a matter of preference. I do boules a lot, since I do most of my bread-baking in a round Dutch oven. Proofing them in a banneton—a round proofing basket—will help the dough retain a nice round shape during proofing, and—crucially—give you that cool spiral effect on the crust. However you go about the shaping, be sure to dust the dough liberally with flour to prevent it from sticking. Even better: dust the outside of the dough and your proofing basket with white rice flour, which can withstand much higher temperatures before burning, so your crust doesn’t get too dark too quickly.
Now, proofing after shaping is important for a few reasons:
First, it allows the dough to reach a consistent temperature throughout. Second, low temperatures and the activity from the shaping mean the gluten network is tight and stiff; this time allows it to warm up, relax, and become flexible again. Third, it allows the yeast to “wake up” from its semi-dormancy in the fridge and get back to work, since you’ll have knocked a lot of the air out of the dough during the shaping.
The proofing isn’t really about fermentation; plenty of that will already have happened in the fridge. It’s more about getting your crumb in order. Letting the gluten relax and giving the yeast time to put in a little more work are both important factors when it comes to the oven spring—the sudden rise your bread will undergo when you first put it in the oven.
Scoring
A couple of things happen when you apply heat to yeast-raised dough. First, the yeast spirals completely out of control—the warmer it gets, the more productive the yeast is, after all. To a point, that is—once your dough hits 140°f, the heat kills the yeast off. Up to that point, the yeast produces a ton of CO2. As it gets hotter still, the gas inside these new air pockets—as well as the larger air pockets in the dough from your first and second proof—will expand rapidly.
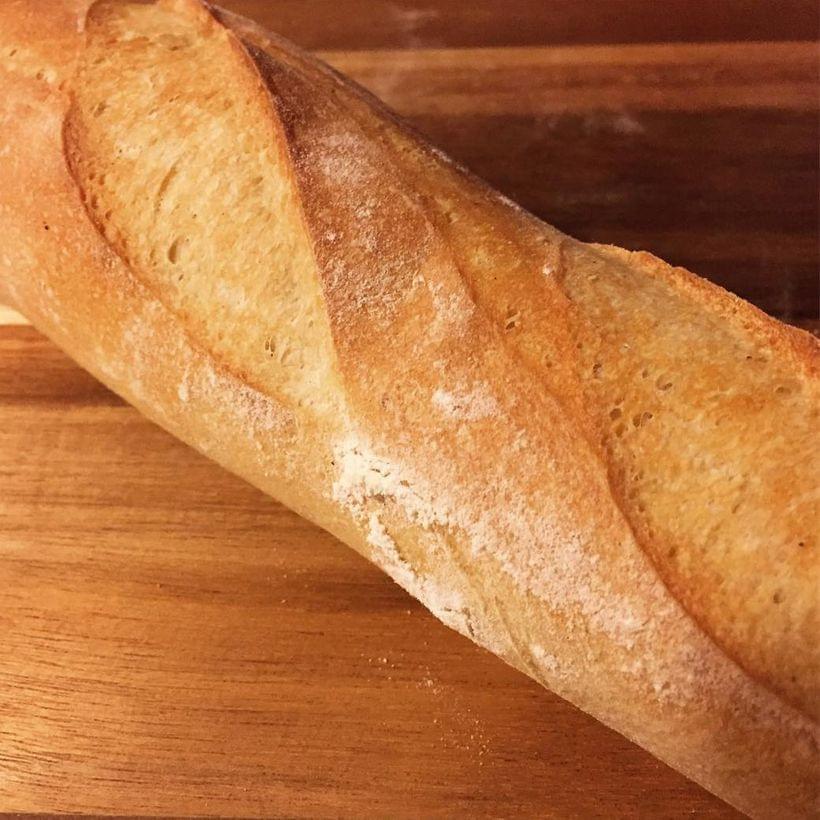
This part of the process is the “oven spring,” or “bloom.” A good oven spring is how you get the much sought after irregularly-sized holes in a good crumb, and one of the keys to a good oven spring is scoring the loaf.
Slashing the would-be crust with a sharp knife or razor blade just before baking gives the bread room to expand—otherwise, the oven spring will be stifled by the crust, and depending on the amount of oven spring, the crust will split open anyway. By scoring the loaf up-front, you’re providing a controlled crust demolition. It can can be as simple as one long slash down the middle of a loaf, or you can do a whole Instagram-worthy thing with it.
There’s not a lot to know, here:
- Slash decisively, in one smooth stroke—hacking away with a dull knife isn’t gonna do you any favors, looks-wise. You can use a lame—which is just a stick with a razor blade on the end, or any sharp knife you have kicking around. I’ve done it; it works. More often than not I use my chef’s knife, which I keep absurdly sharp.
- Make your cuts at a 45-degree angle if you want those coveted “ears”—the flaps of crust that curl up and out over the slashes, once baked. Said slashes are called grigne; French for “grin.”
- For a longer loaf, make sure your cuts overlap each other slightly, so your loaf has room to expand uniformly. Likewise—for longer loaves—make your cuts down the length of the bread, not across.
Baking with Steam
The big difference between baking just-okay bread and baking really good bread is steam. Trapping steam in the oven means that the crust of your bread won’t dry out—so it stays flexible, allowing it to stretch as the bread expands. A flexible crust means a better oven spring and a nicer crumb.
It also means the crust itself bakes up better—to a point. Steam helps the starches on the surface of the dough gelatinize, forming a crisp, glossy, blistered outer layer—which, with enough time and heat becomes a rich, glossy, caramelized brown. Too much steam will keep the crust too cool—and prevent that second phase from kicking in, leaving you with a pale, gummy crust.
Bakeries have fancy steam-injection ovens to deal with all this steam fine-tuning. You and I do not. So, there are a couple of tricks we can use instead, from least to most practical.
Faking a Steam Oven
This, it should be said, sucks to do.
Set a small sheet pan that you do not care about destroying at the bottom of your oven. Crank your oven up to five hundred degrees, and let it preheat for at least a half hour longer than it takes for it to tell you it is up to full temperature. In the meantime, boil a few cups of water. Put all but a cup of it into a spray-bottle.
Put your (scored) bread into the oven on a sheetpan or—ideally—move it onto a similarly well-preheated pizza stone. Now, take about a cup of boiling water and pour it into that now-screaming-hot pan. This will be loud, jarring, and—I don’t mind saying—not the safest thing you have ever done. Do not scald yourself. Also, the sheet pan will be warped beyond use. Shut the door, wait a minute or two, open the oven door a crack, and mist the inside of the stove with the spray bottle. Do this two more times, waiting a few minutes between each spritz. After the third time, turn the oven down to 450f, and bake until the crust is a nice deep brown.
This process will keep the inside of the oven nice and humid for the first phase of cooking. The water in the pan will boil off eventually, the inside of the oven will dry out, and the crust will have time to dry out and bake properly.
I have done this many times.
I do not do this anymore.
This sucks.
Use a Dutch Oven
I use my enameled cast iron Dutch oven instead. Turn your oven up to 500°f and preheat it with the dutch oven in there (make sure you have the kind with an oven-safe knob on the lid, or an all-iron combo cooker).
Once as preheated as it’ll ever get, remove the (extremely hot) lid, set your scored bread in there, and give it a couple of spritzes with hot water. Cover it and lower the temperature to 450°f. The lid traps the steam from the bread itself inside; no fuss, no muss. Remove the lid for the second half of the total bake time. That’s it.
Spray It With Hot Water a Couple Times
Don’t have a Dutch oven, and don’t want to create a potentially hazardous engineering project out of your kitchen? Get a spray bottle, fill it with hot water, and crack the oven door to lightly mist the top of the bread every few minutes during the first half of the baking time. It’s not ideal, but better than nothing.
Bake Time
Eventually you’ll just have a gut sense of how long a certain volume of dough is gonna take. These days I only use a timer as a “hey, don’t forget to check on this,” so I don’t get distracted and burn something.
But speaking of: don’t be a chicken about letting the crust brown. For a shatteringly crispy crust and a full depth of flavor, you want it to have reached a rich mahogany brown.
As a general guideline, bake to an internal temperature of 210°f on an instant-read thermometer—stab it right into the bottom of the loaf. If I’m working with a total flour weight of 1000g and split it into two Dutch-oven-sized boules, that usually works out to about thirty five minutes with the lid in place, and another twenty or so minutes uncovered. Follow your recipes for now, and you’ll get more of a feel for it as time goes on—but when in doubt, check that you’ve hit 210°f.
Once your bread is done, pull it out of the oven and set it on a wire rack so that air can circulate around it fully—otherwise, parts of the crust could go a little squishy on you. Listen now, as a point of pride, for the bread to “sing”—a term that I stress I absolutely did not invent. As the crust cools, it’ll crackle.
If you hear that sound, you nailed it. If not, who cares; you still have some fancy-ass bread, and bread rules.
Put Down the Knife
Here, per the rules of foodblogs, I’m supposed to say something exclamation-pointy about how I can never resist cutting into it right away even though I’m “not supposed to” and blah blah “smell of freshly baked bread,” etc.
Listen to me: you are a grown-ass adult. Wait half an hour before you cut into the bread.
Your starches are still setting. Cutting into your bread now is just gonna mean mashing it to death with a knife, exploding your crust all over the place and rewarding you with—at best—a doughy, gluey, seemingly under-baked crumb. After all this—after waiting days for some bread—you deserve better.